Opening the settings window
To configure your Radar Screensaver you must open its configuration window. To open settings window, go to the "Display" applet on the Windows control panel. There, switch to "Screensaver" tab and choose the Radar Screensaver from a list of the screen savers installed on your system. Press the "Settings..." button and Radar Screensaver settings window will open.
You will see a dialog window with four tabs and buttons: "OK", "Cancel" and "Help". To get help on particular control element on a window, click with the right mouse button on it and choose "What is this?" context menu item. To get help page for the whole tab, press the "Help" button or F1 key.
Radar model settings
First and main tab of the configuration window is "Radar" tab with all the settings which determine how Radar Screensaver animation will look. Below is a screenshot of this tab:
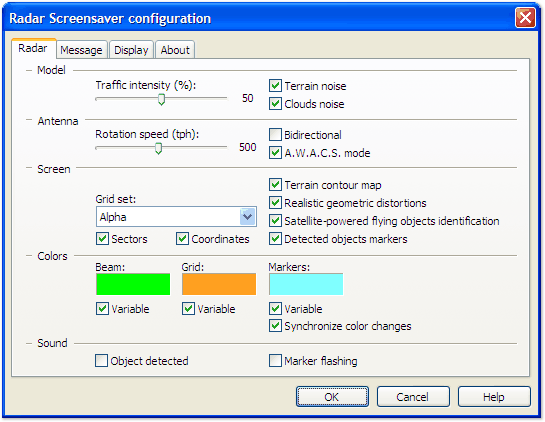
- Traffic intensity This slider determines how many flying objects will take part in simulation. 100% value corresponds to approximately 50 objects. Decrease this value to avoid a mess on your display when markers are enabled.
- Rotation speed Choose how fast the radar antenna will be rotating. This value is measured in turns per hour.
- Grid set Choose one of the grid sets installed on your system. Radar Screensaver 1.72 includes five sets. Choose 'none' to disable grids at all.
- Sectors Enable four sector displays, located at corners of your video display. These will show raw radar beam data sweep.
- Coordinates Enable logs, located at left and right sides of your video display. Each time radar beam exposes a flying object, its parameters (code, type, azimuth, distance, speed and course) will be added to the bottom of the appropriate log column.
- Beam, Grid and Marker colors Choose the colors of main animation elements.
- Variable These checkboxes determine which of the animation elements will change their colors. This will help to eliminate static elements on your video display during animation.
- Object detected sound Enable sound playback after flying object recognized by radar system.
|
- Terrain noise Enable noise on radar display caused by radio beam reflection off the surface.
- Clouds noise Enable noise on radar display caused by radio beam reflection off the clouds.
- Bidirectional Enable two radar beams in opposing directions instead of one.
- AWACS mode Make radar site mobile: it will fly around the controlled airspace.
- Terrain contour map Enable terrain contour map projection onto main radar display.
- Realistic geometric distortions The radar image on main display will be "smashed" or blurred like on real radars.
- Satellite flying object identification This mode will show you the process of identifying newly detected flying object. First of all, it will acquire satellite photo of the object, then it will recognize its type, and at last, this system will show you the picture of the object and its type.
- Detected objects markers When enabled, each detected object will be supplied with special marker which contains main object parameters, like its speed, distance, course and azimuth.
- Synchronize color changes When several colors were made variable, it may happen that two elements will have same color during animation. If you want avoid this, enable this option.
- Marker flashing Enable sound playback on each flash of marker digits.
|
Message settings
Second tab contains settings for message you may want to leave for someone who may visit your workplace and will try to close screensaver:
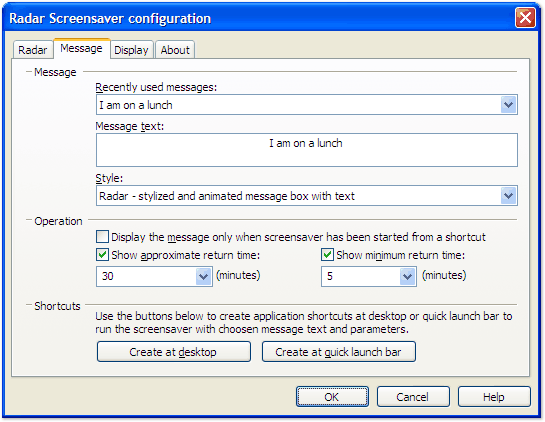
- Recently used messagesThere is a list of message text you used recently. Choose one and it will be copied immediately into the message text box below.
- Message text Type text of your message there.
- Style Choose one of two styles of message box. First is default and second implemented in radar style.
- Display the message... Enable this option to disallow showing the message when screensaver starts automatically after some idle time.
- Approximate return time You may type there approximate time you will be out of your desktop. When screensaver will show the message it will calculate approximate time before your return and will show it.
- Create shortcut at desktop Press this button to create an application shortcut on your desktop. It will be named as 'Radar Screensaver (n)' where n – is some number used to avoid duplicate names. You can later rename it to more descriptive name. Use this shortcut for immediate screensaver start.
|
- Minimum return time If you underestimated the time of your absence and approximate time run out, you may use this option to disallow showing the time less than amount set there.
- Create at quick launch bar Press this button to create an application screenshot at quick launch bar instead of desktop.
|
Configuring display
Third tab of configuration window is "Display". It allows to set animation smoothness, display resolution and multi-monitor configuration settings (if your PC has more than one video display).

- Simulation smoothnessThe higher values – the smoother animation – the more computational requirements to your system (processor and graphics card). It is measured in Frames-Per-Second (FPS). Note, that this value is only desired smoothness. If you will set it too high, but the system will not be capable to achieve it, the screensaver will smoothly reduce it automatically to avoid jerky animation.
- Same simulation models on all displaysThis option is available if your PC has two or more monitors attached. Check this box to see same situation model on all displays involved in operation.
- Video modeThis is a parameter of your display. Choose the resolution and color quality to use in full-screen operation. Choose 'Automatic" to allow the screensaver to use current desktop resolution.
- Leave blackThis option is available if your PC has two or more video displays attached. Check this box to disable animation on this display. It will remain black during operation.
Note 2: If your PC is equipped with more than one monitor, you will be able to set their resolution and color depth settings separately.
The "About" tab
The fourth and last tab of configuration window is "About". There you can find software developer contact information, your registration information (registered user name and key code). In addition, there you will be able to view the text of license agreement, look for updates, and change user interface language.

- Contact informationThis part of tab contains a hyperlink to software information web-site.
- LanguageChoose the user interface and/or on-line help language from installed on your system. Radar Screensaver 1.72 includes only English language. Use the link below to get additional interface translation packages. There you will find the information how to translate the interface/help by yourself. We promise that you will get a free key code in case if you will be the first who made and sent it to us.
- LicenseThere you may see the registered user name, key code, and a button to view the license agreement. Note: if your copy of screensaver is not activated yet, you will be able to enter your registration information here and activate it with "Activate" button.
- Activate If your copy of the Radar Screensaver is not registered yet, type your registration information and press this button to activate your copy.
- VersionThis part of tab contains your current version number and copyright notice.
- Look for updatePress this button to open a small internet browser window, which will request software web site for available updates. It will transfer to the site only version number.
Back on top